This is officially my first blog post. Which means it needed to be special! And celebratory. And fun! So logically that means it needed to involve chocolate. Chocolate fudgey gooiness, to be precise. Even better…chocolate fudgey gooey high-protein, primal-friendly, grain-free, low-carb happiness! In other words…
BROWNIES!
These babies have infiltrated Super Bowl parties and camping trips without once blowing their cover. They are that good…

A brief history of this brownie revelation:
Back in the dawn of time, when dinosaurs ruled the earth, and yours truly was barely learning to read & write, my mom had the glorious tradition of celebrating school achievements with some kind of baked creation–often courtesy of Duncan Hines’ “Dark Chocolate Fudge Brownie Mix.” This was how my brain became hardwired to associate brownies with “Yay me!”
I grew up, learned to safely operate an oven, became expert at finding excuses to celebrate myself…and with the advent of the internet I met the brilliant Ina Garten. Turns out that her Outrageous Brownies are the pinnacle of perfection. And also the pinnacle of waistline destruction.
So one rainy day when I was bored and lusting for chocolate, I got to tinkering and converting until I produced a healthified version that could be deemed worthy of the name “brownie”. And I came up with a paleo-friendly, gluten-free, sugar-free, low-carb brownie! That is high in protein as an added bonus. (Trim Healthy Mamas, you will be pleased to know this is also entirely on plan, filed under S…as in Splendid)
I lovingly called these “Shoeless Duchess Brownies”….because, duh, if you are tampering with a Barefoot Contessa creation, then your version is by default almost-but-not-quite-as awesome…I mean, no one is as awesome as the Barefoot Contessa. But I’m shooting for coming in at a close second with these.
So there you are.
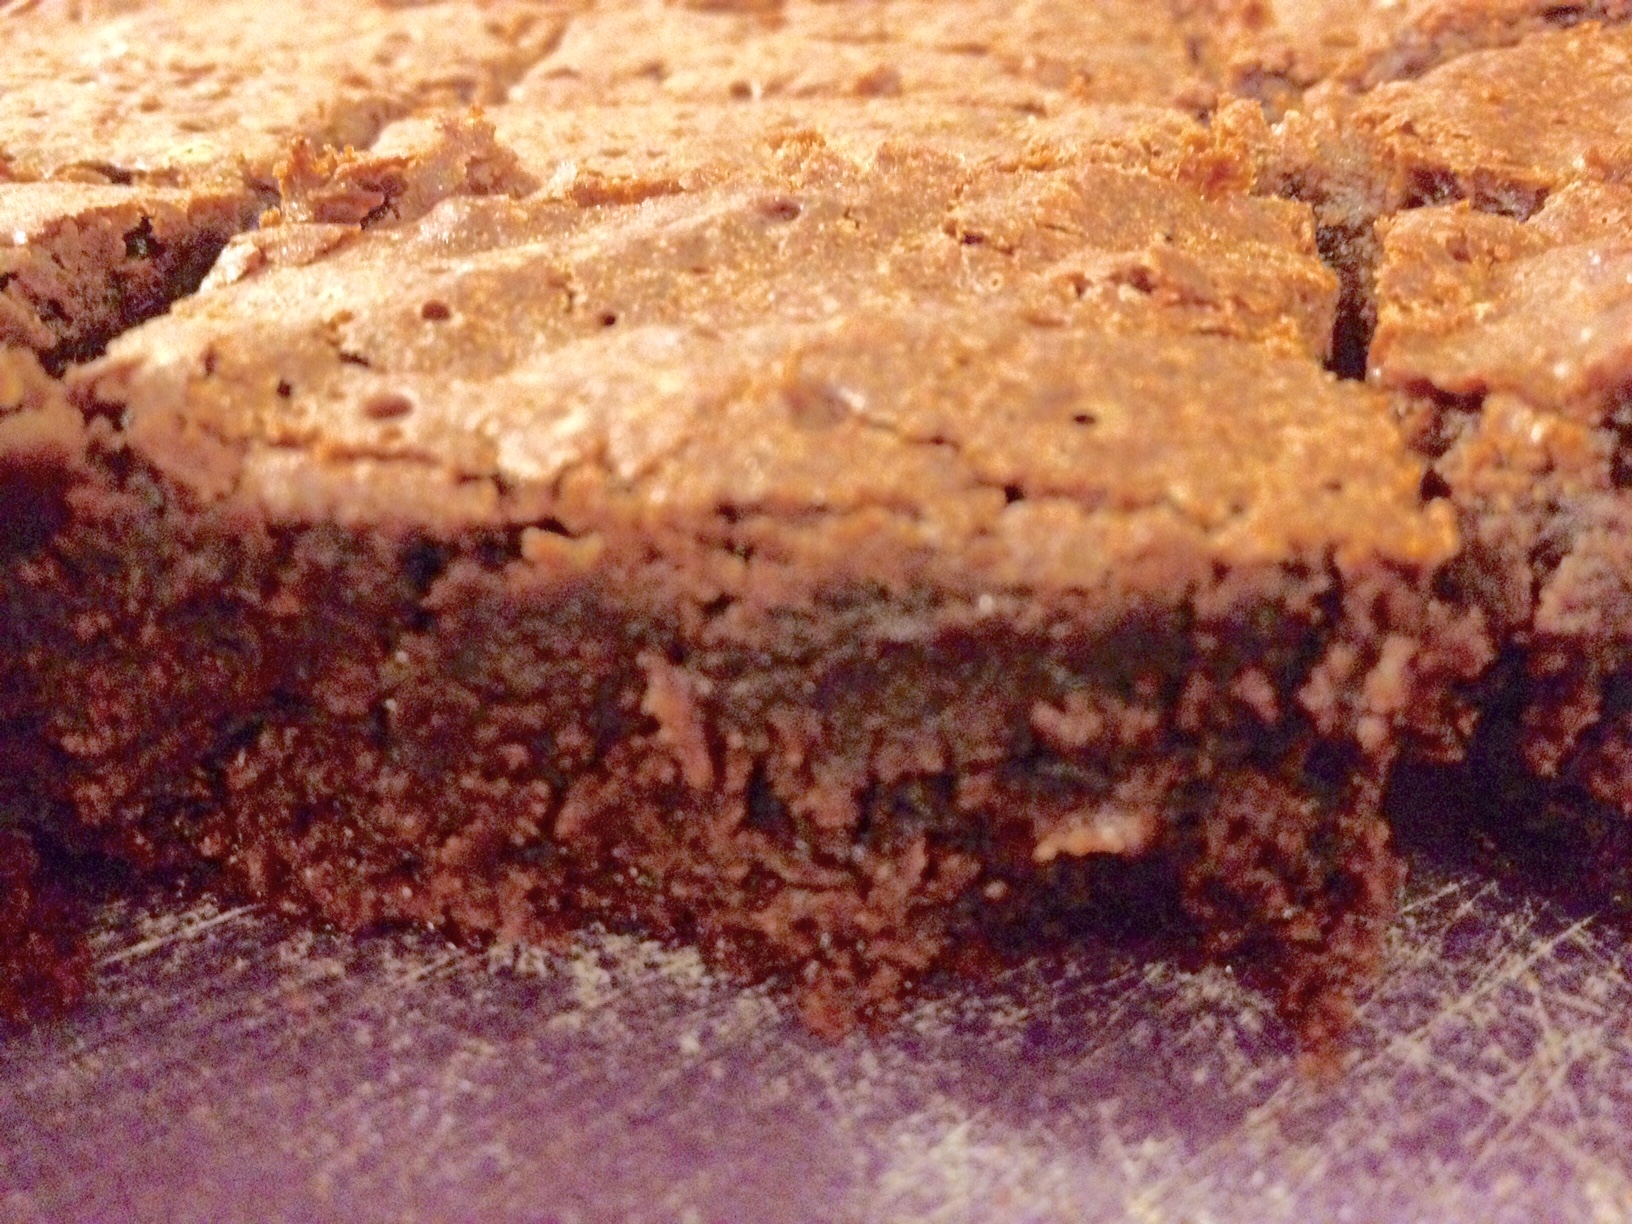
Gaze upon this closeup and notice how the crackly top caresses the dense, fudgy center. Go ahead and make them. Your life will never be the same.
Now…A few pointers for successful brownie-making
This decadent treat takes less than 15 minutes to assemble (not including baking time). But there’s a couple tricks to putting these lovelies together…
The chocolate:
My original inspiration called for baking chocolate and chocolate chips. I’m trying to be carb-conscious and all-natural here, so instead I used unsweetened baking chocolate and a combination natural raw cacao butter + cacao powder. (We’ll discuss sweeteners later). This stuff is the holy grail of chocolate dessert making. And it is an all-natural, unrefined healthy saturated fat. Instant win! ( and if you have some time on your hands, head over here to find out why natural saturated fats make your heart and body happy)
I’m linking my favorite cacao butter & cacao powder for your convenience. Regular Hershey’s cocoa powder works too, but I like the raw powder better because it isn’t bitter. You could also use refined coconut oil or organic palm shortening instead of the cacao butter, but I promise the real stuff takes it to another level. If you don’t use it, then add 1/4 tsp chocolate extract to up the flavor.
The sweeteners:
I’m 95% an all-natural girl. When in need of sugar, I usually opt for raw honey, maple syrup, & piloncillo (rapadura/Sucanat), with occasional coconut sugar to switch things up. Any and all of these could work in this recipe, but my primary goal was to avoid the fat+sugar combo of waistline death. And however natural, sugar is still sugar–and I really wanted to keep this recipe diabetic-friendly.
Enter the magical stevia plant, and my two favorite sugar alcohols. I use a combination of all three, plus a generous pinch of unrefined sea salt, to come up with a satisfying, balanced sweetness with no aftertaste. You can substitute Truvia, Swerve, or THM Sweet Blend if you wish.
The short version of the story, is that natural stevia extract is made by evaporating the juice from a humble South American plant. Making it an all-natural sweet taste that doesn’t have carbs or sugar. Xylitol and Erythritol are fermented naturally-derived sweeteners that pass through the body without being absorbed, and hence do not impact blood sugar levels. (read more here, here, and here).
I don’t consider these last two entirely natural as per my stringent criteria…but based on my research they seem pretty neutral safety-wise…and a girl’s gotta live! Every now and then a low-carb grain-free brownie is just what the doctor ordered. It’s still healthier than stirring up a box mix!
I’m aware of the heated debate surrounding these, and if you prefer please feel free to substitute the all-natural sweetener of your choice. Or even use white sugar if you wish. I promise I won’t hold it against you. Dessert shouldn’t be the foundation of our diet anyway, so I’m pretty Hakuna Matata when it comes to sweetener choices.
Now….
Tips & Tricks
You will be melting all the chocolate components together. I typically do this in a small heavy-bottomed saucepan on low heat, stirring constantly. It is important to watch it carefully, because scorched chocolate is no fun. (Or if you want to be fancy, you can do this in a double boiler and avoid babysitting the melting process)
Once the chocolate has melted, remove it from the heat and let it cool down a bit. Feel free to pour some wine, it makes baking way more fun.
Then measure all the dry ingredients into your blender, cover, and blend on high until the mix has a texture roughly resembling powdered sugar. You may need to stop a few times and shake the blender jar up and down a bit. This is to loosen up the powder and make sure it doesn’t all clump at the bottom. This should take less than 60 seconds (also make sure you hold on to the lid while you shake…don’t ask me how I discovered the vital importance of this.) When all your drys are nicely powdered, dump them out into a fine mesh strainer and sift into a bowl. The purpose of this powdering/sifting is to make sure your final fudgy result is smooth and silky…coconut flour can be a bit gritty otherwise. Ah the joys of gluten-free tinkering….
Then you’ll whisk together eggs and vanilla, and temper them by whisking in a small amount of the melted chocolate in a thin stream. If your chocolate has already cooled to room temp you don’t need to worry about this. But if it is still pretty hot, you want to add it to the eggs gently, to avoid ending up with chocolatey scrambled eggs.
Finally you mix everything together, and bake. You’ll start the brownies at 375 to firm up the edges, then turn the oven down to 325 so that the edges don’t burn and the center firms up evenly. Brownies will be done when the edges separate barely from pan, the top springs back when lightly touched, and toothpick inserted comes out mostly clean, but with a few moist crumbs. The good news is, these are hard to overbake.
When you take them out, let them cool for about 10 minutes before removing from the pan. They do need to cool completely before cutting so they don’t fall apart. (Flash cooling in the freezer is totally an option)

Ok all of the above sounded complex but it’s really a breeze to throw together, I promise. Without further ado, here’s the complete recipe…
On your mark….bake…devour!
Shoeless Duchess Brownies
Ingredients:
Chocolate base:
- 3 oz unsweetened baking chocolate
- 1/2 cup butter (1 stick)
- 1/3 cup raw food-grade cacao butter (or coconut oil or palm shortening)
- 1/3 cup cacao powder
- 3 eggs (or 1/2 cup liquid egg whites)
- 1 tbsp vanilla extract
Dry ingredients:
- 1/4 cup + 1 tbsp birch xylitol
- 1/4 cup + 1 tbsp erythritol
- 1/2 tsp pure stevia powder
- 1/4 cup coconut flour
- 1/2 tsp unrefined sea salt
- 1 tsp baking powder
- 1/2 tbsp xantham gum
- 1/4 cup whey protein powder (unflavored or vanilla)
- 1 tbsp arrowroot powder
Directions:
- Preheat oven to 375 deg. Butter a 9 x 9 inch square baking pan and line bottom with buttered parchment paper.
- Melt together chocolate, butter, cacao powder, and cacao butter.
- Measure dry ingredients into blender, cover, and blend on high until finely powdered. Dump mix into fine mesh strainer and sift into mixing bowl. Set aside.
- Whisk together eggs and vanilla, then temper them by whisking in a small amount of the melted chocolate in a thin stream. Combine well, then stir in remaining chocolate mixture.
- Pour into baking pan and bake for 15 minutes. Turn down oven temperature to 325 and bake for about 20-30 more minutes until edges separate barely from pan, top springs back when touched and an inserted toothpick comes out clean with a few moist crumbs.
- Leave in pan for about 10 minutes before flipping onto cooling rack. Cool COMPLETELY before cutting into 16 squares.

[…] Recipe via thecrispycupboard.com […]
[…] Ha! I think I am none-of-the-above. 😀 Even that, I will surely enjoy these gluten-free, primal & low-carb Brownies. […]
Thank you for the link! I hope you enjoy them! 🙂
This looks so yummy! I’m always looking for new recipes 🙂 I look forward to following your blog!
-April from The Thin Kitchen
Thank you April! Stay tuned for more!
Ps. Your site is beautiful…I got hungry just looking at the pictures!
Oh wow they look so delicious ❤ Welcome to the blogosphere! I can't wait to read more from you and I hope you'll enjoy blogging as much as we all do here 🙂
Thank you for your kind words! 🙂
I hope you enjoy making these…I’ll be posting more goodies soon!